A Handmade "Baby’s First Christmas" Ornament

An Attelier Pippalotta Kit Review

Some links in this blog post may be affiliate links. This means if you click through and purchase the product, I earn a small commission at no additional cost to you. Thank-you.

When I was pregnant with my son Josey I was so excited to work on a couple baby related crafts. I decided to add his first Christmas ornament onto the project list because I wanted to make sure I made something for him a little more permanent than the baby clothes I knew he would very quickly grow out of. This craft got me so excited for his arrival and I had so much fun making it! It was a great way to learn some basic Waldorf Doll making techniques as well. I can’t wait to use the skills I learned from this kit to make more ornaments from my own ideas. Maybe a little character made custom to his interests each year.

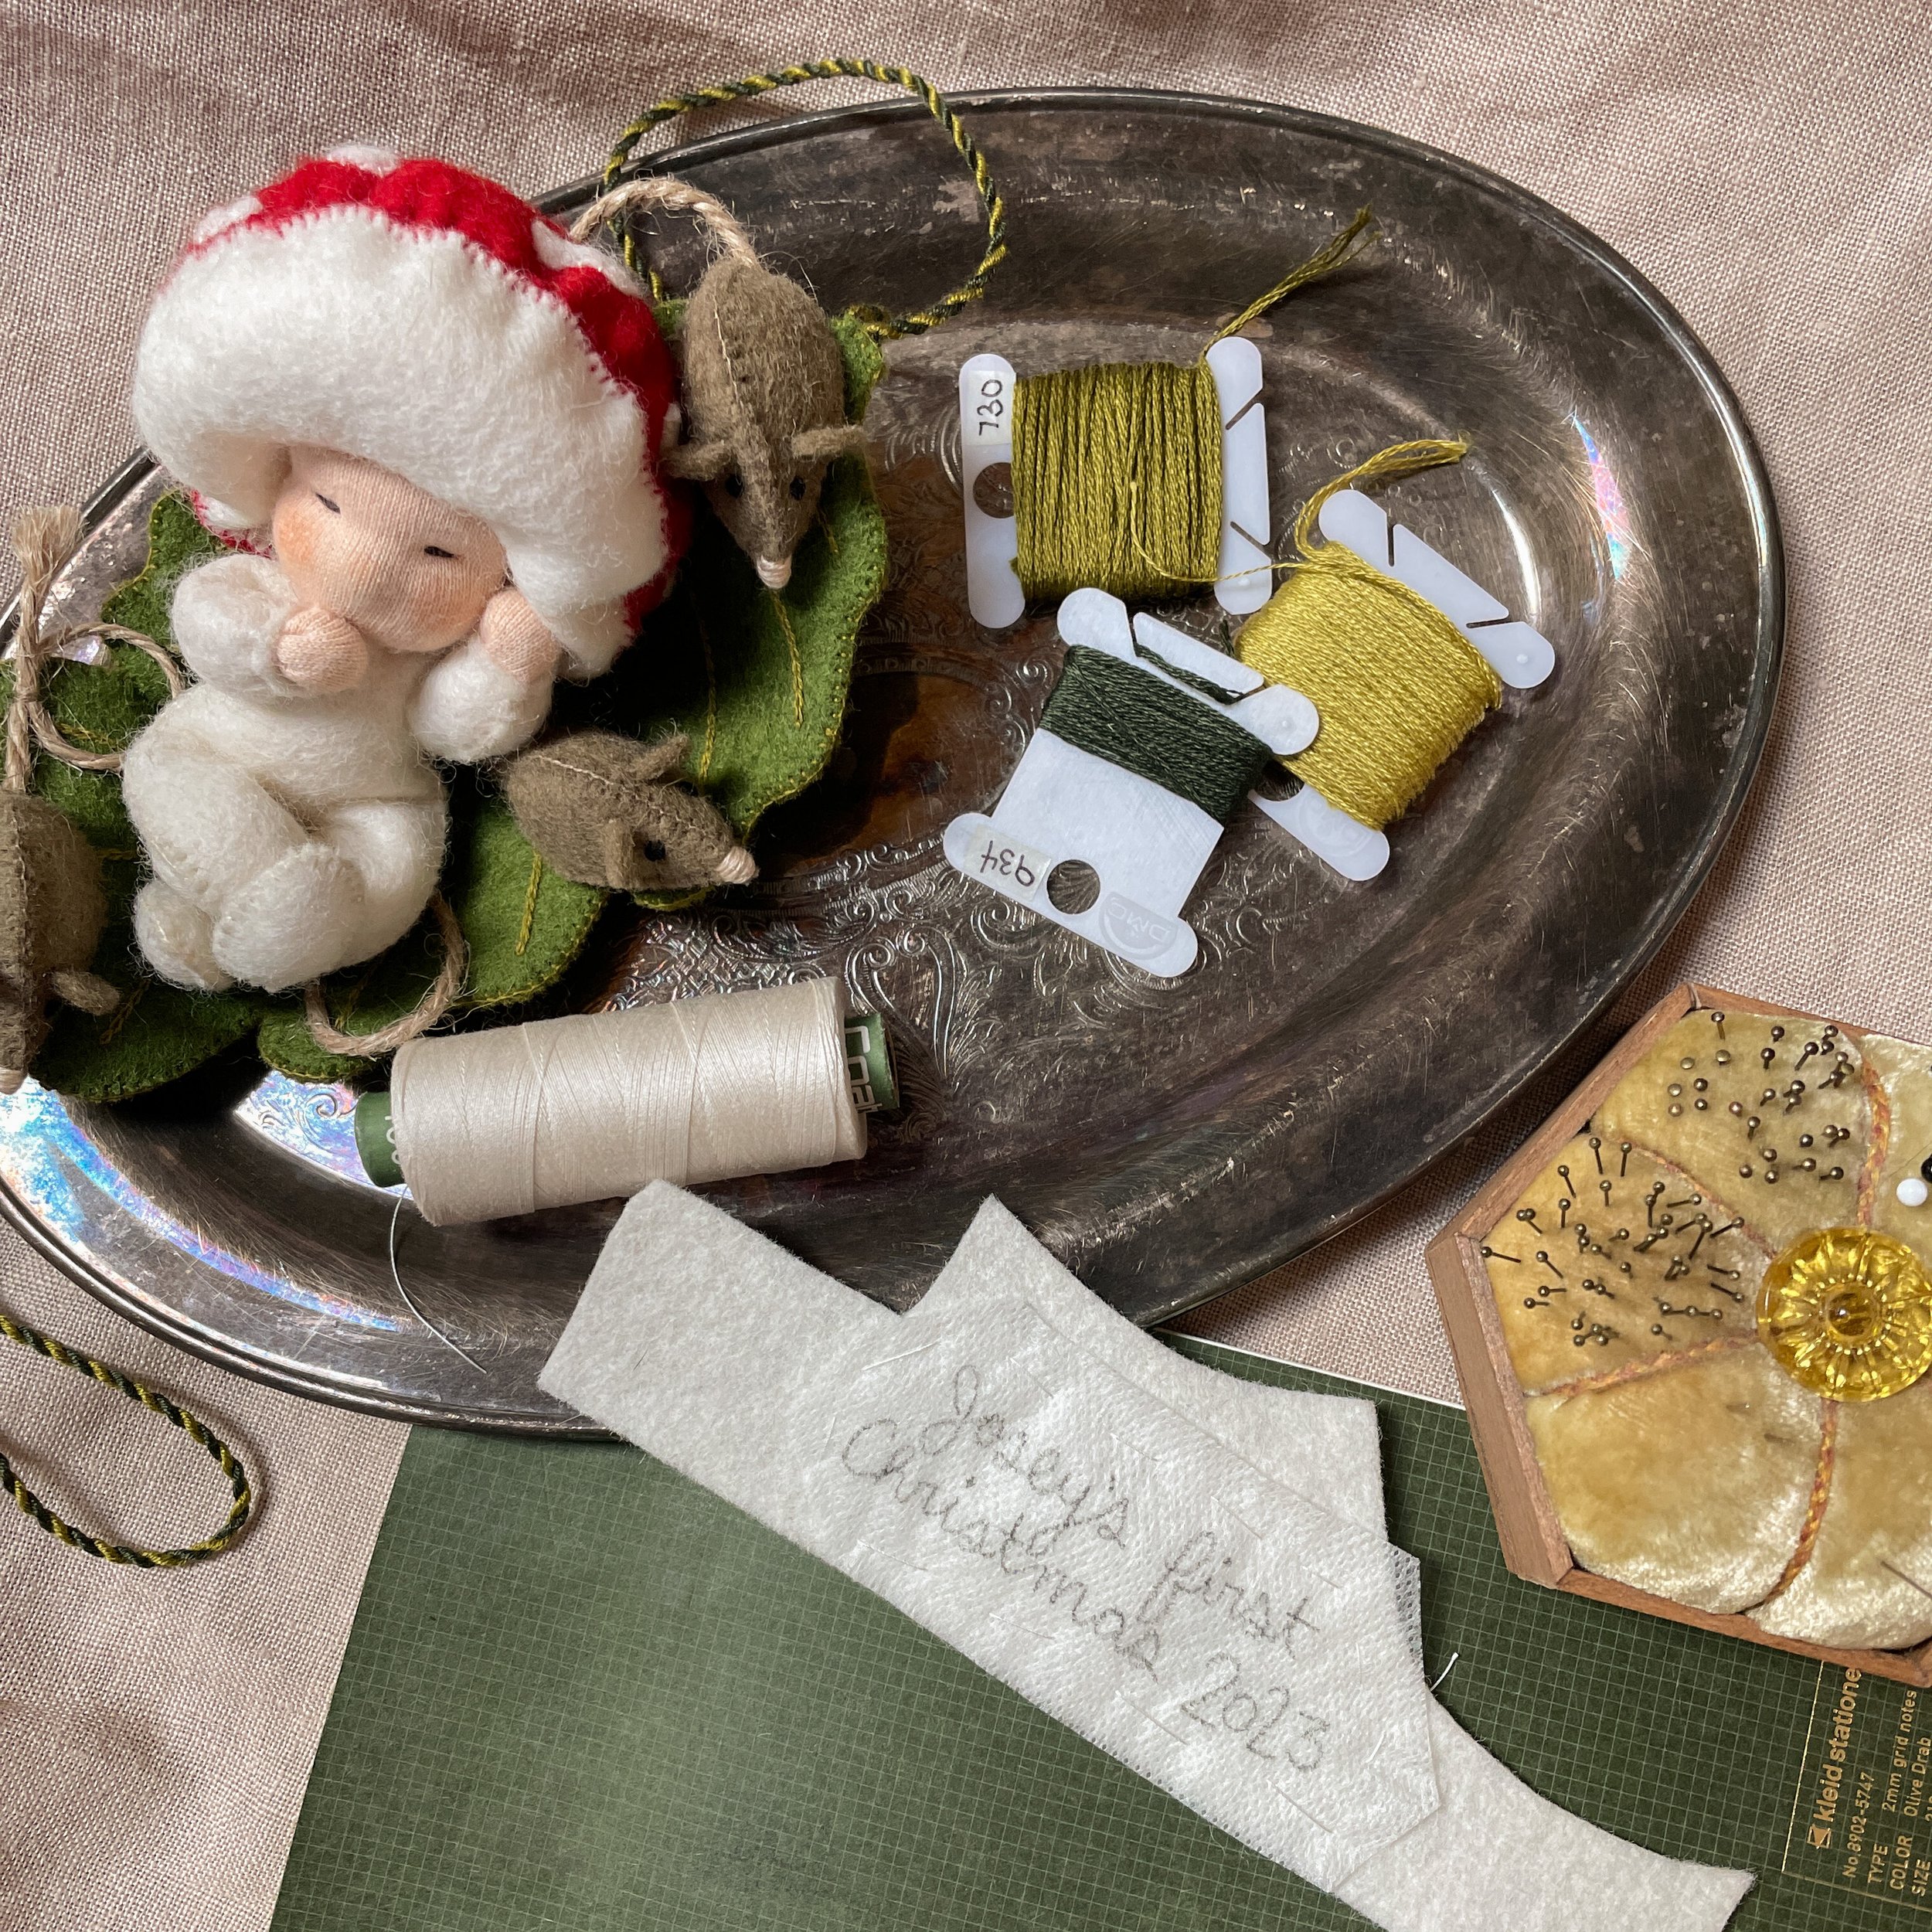
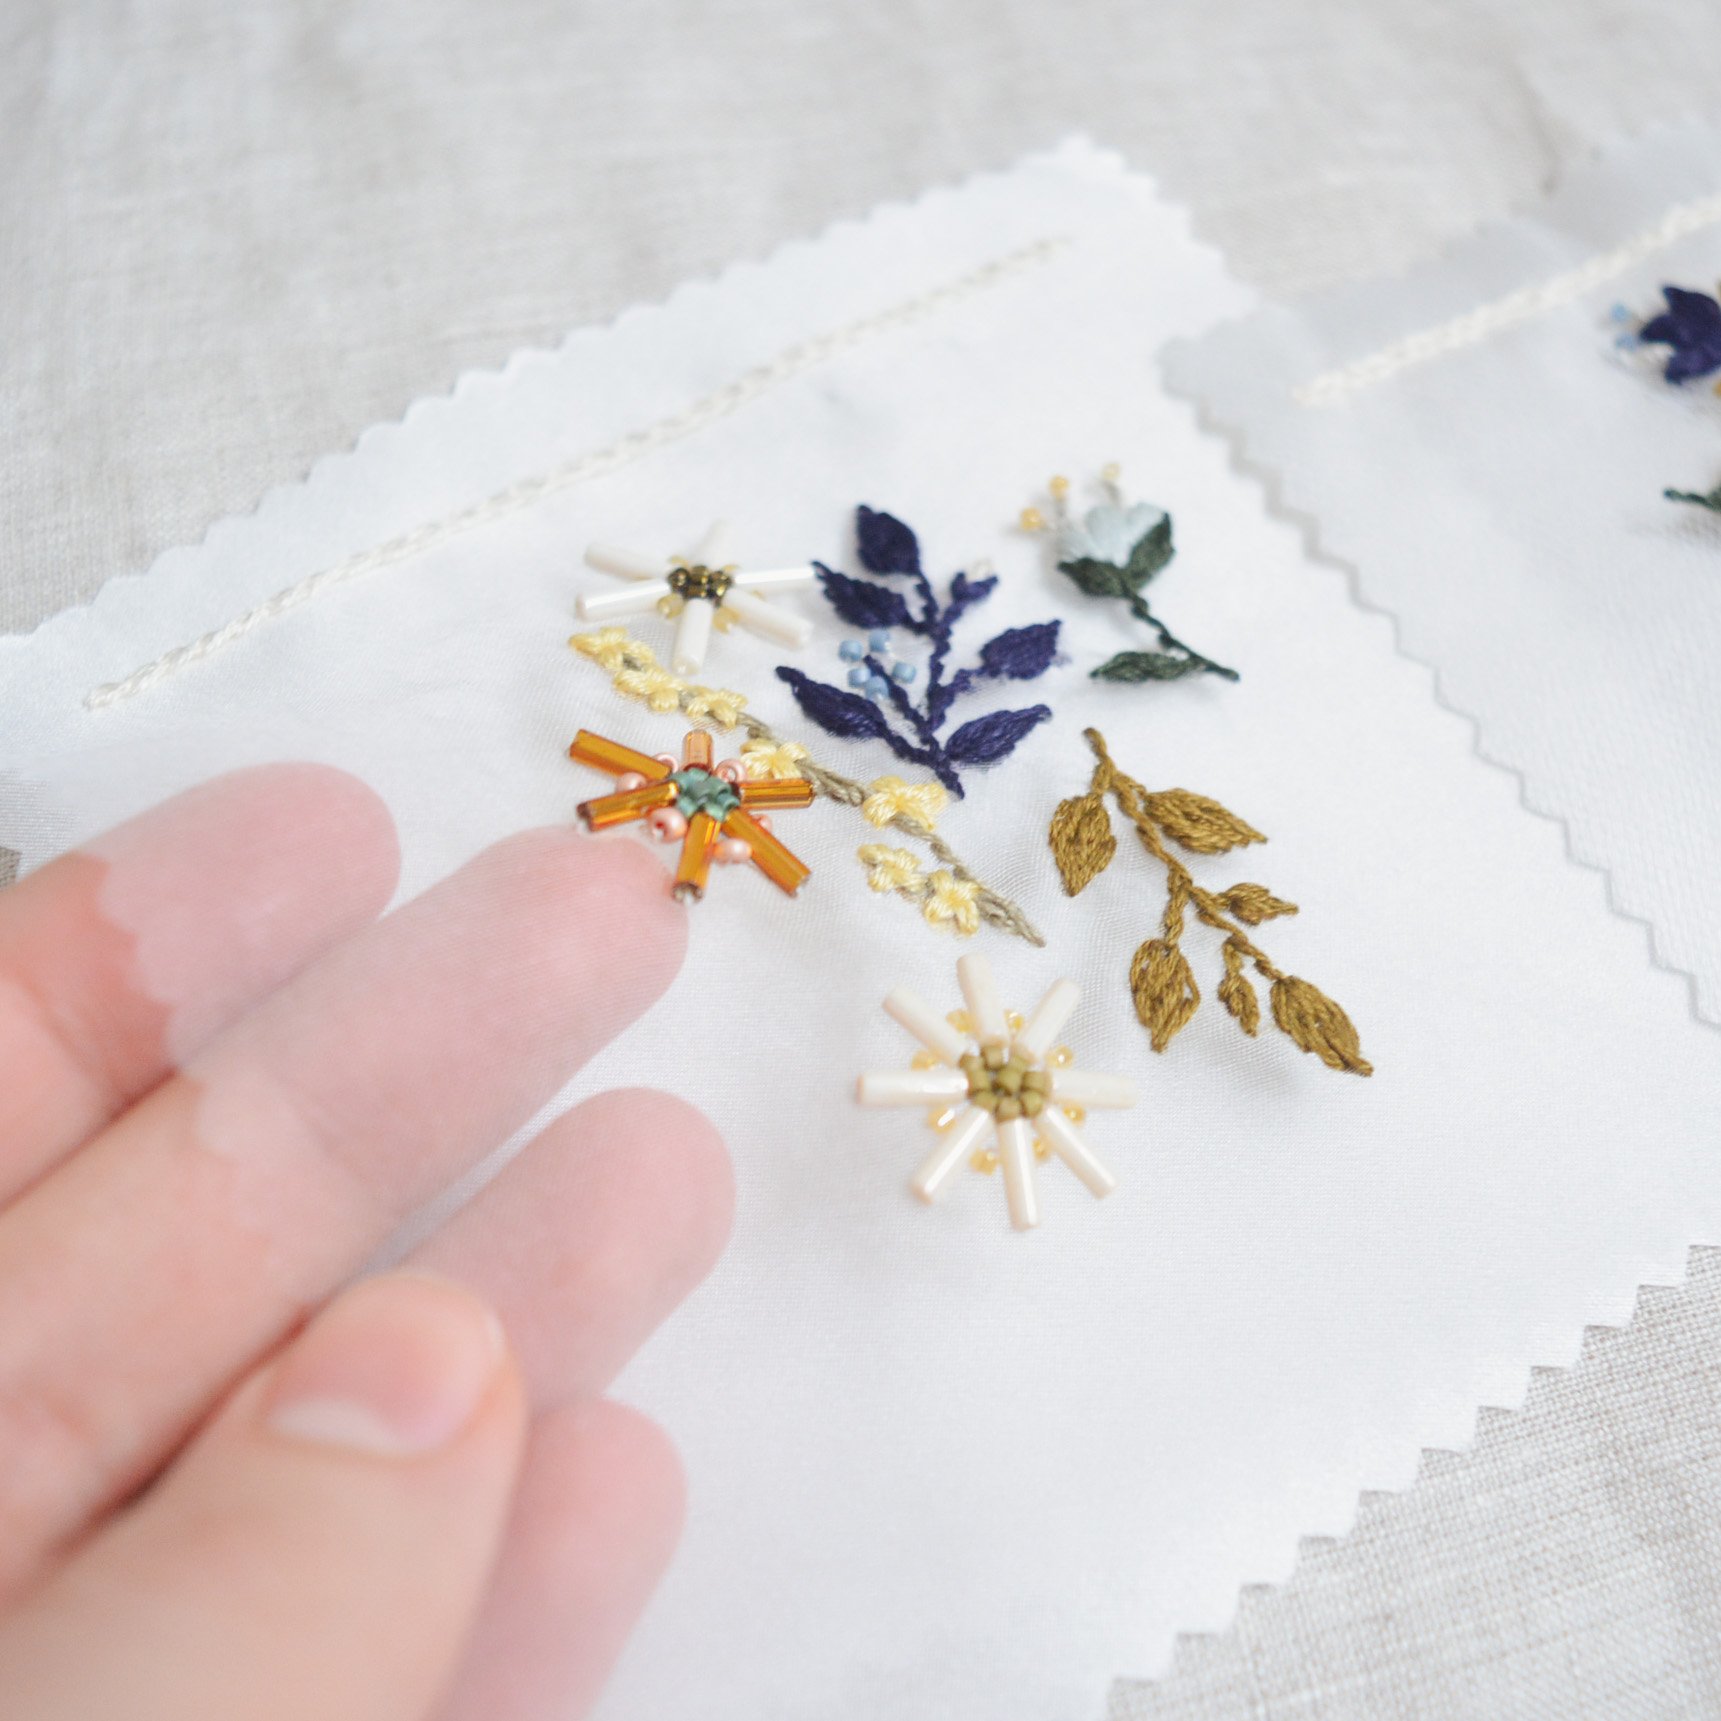
This is the “Forest Gnome Baby” Attelier Pippalotta kit and even though I’ve never made a doll like this before I found it pretty straightforward! I do have basic hand sewing skills, so I think if this was your first time ever sewing you might have a more difficult time following along. I stitched the baby exactly as instructed and only made a couple modifications to the leaf bed. I cut a second leaf out of felt from my stash and blanket stitched the two layers together so the bed would be sturdier. I stitched the design on the leaf using chain stitch which I prefer the look of to the more basic back stitch. I also added two cords for hanging so that the bed would hang in the tree like a cute little hammock.

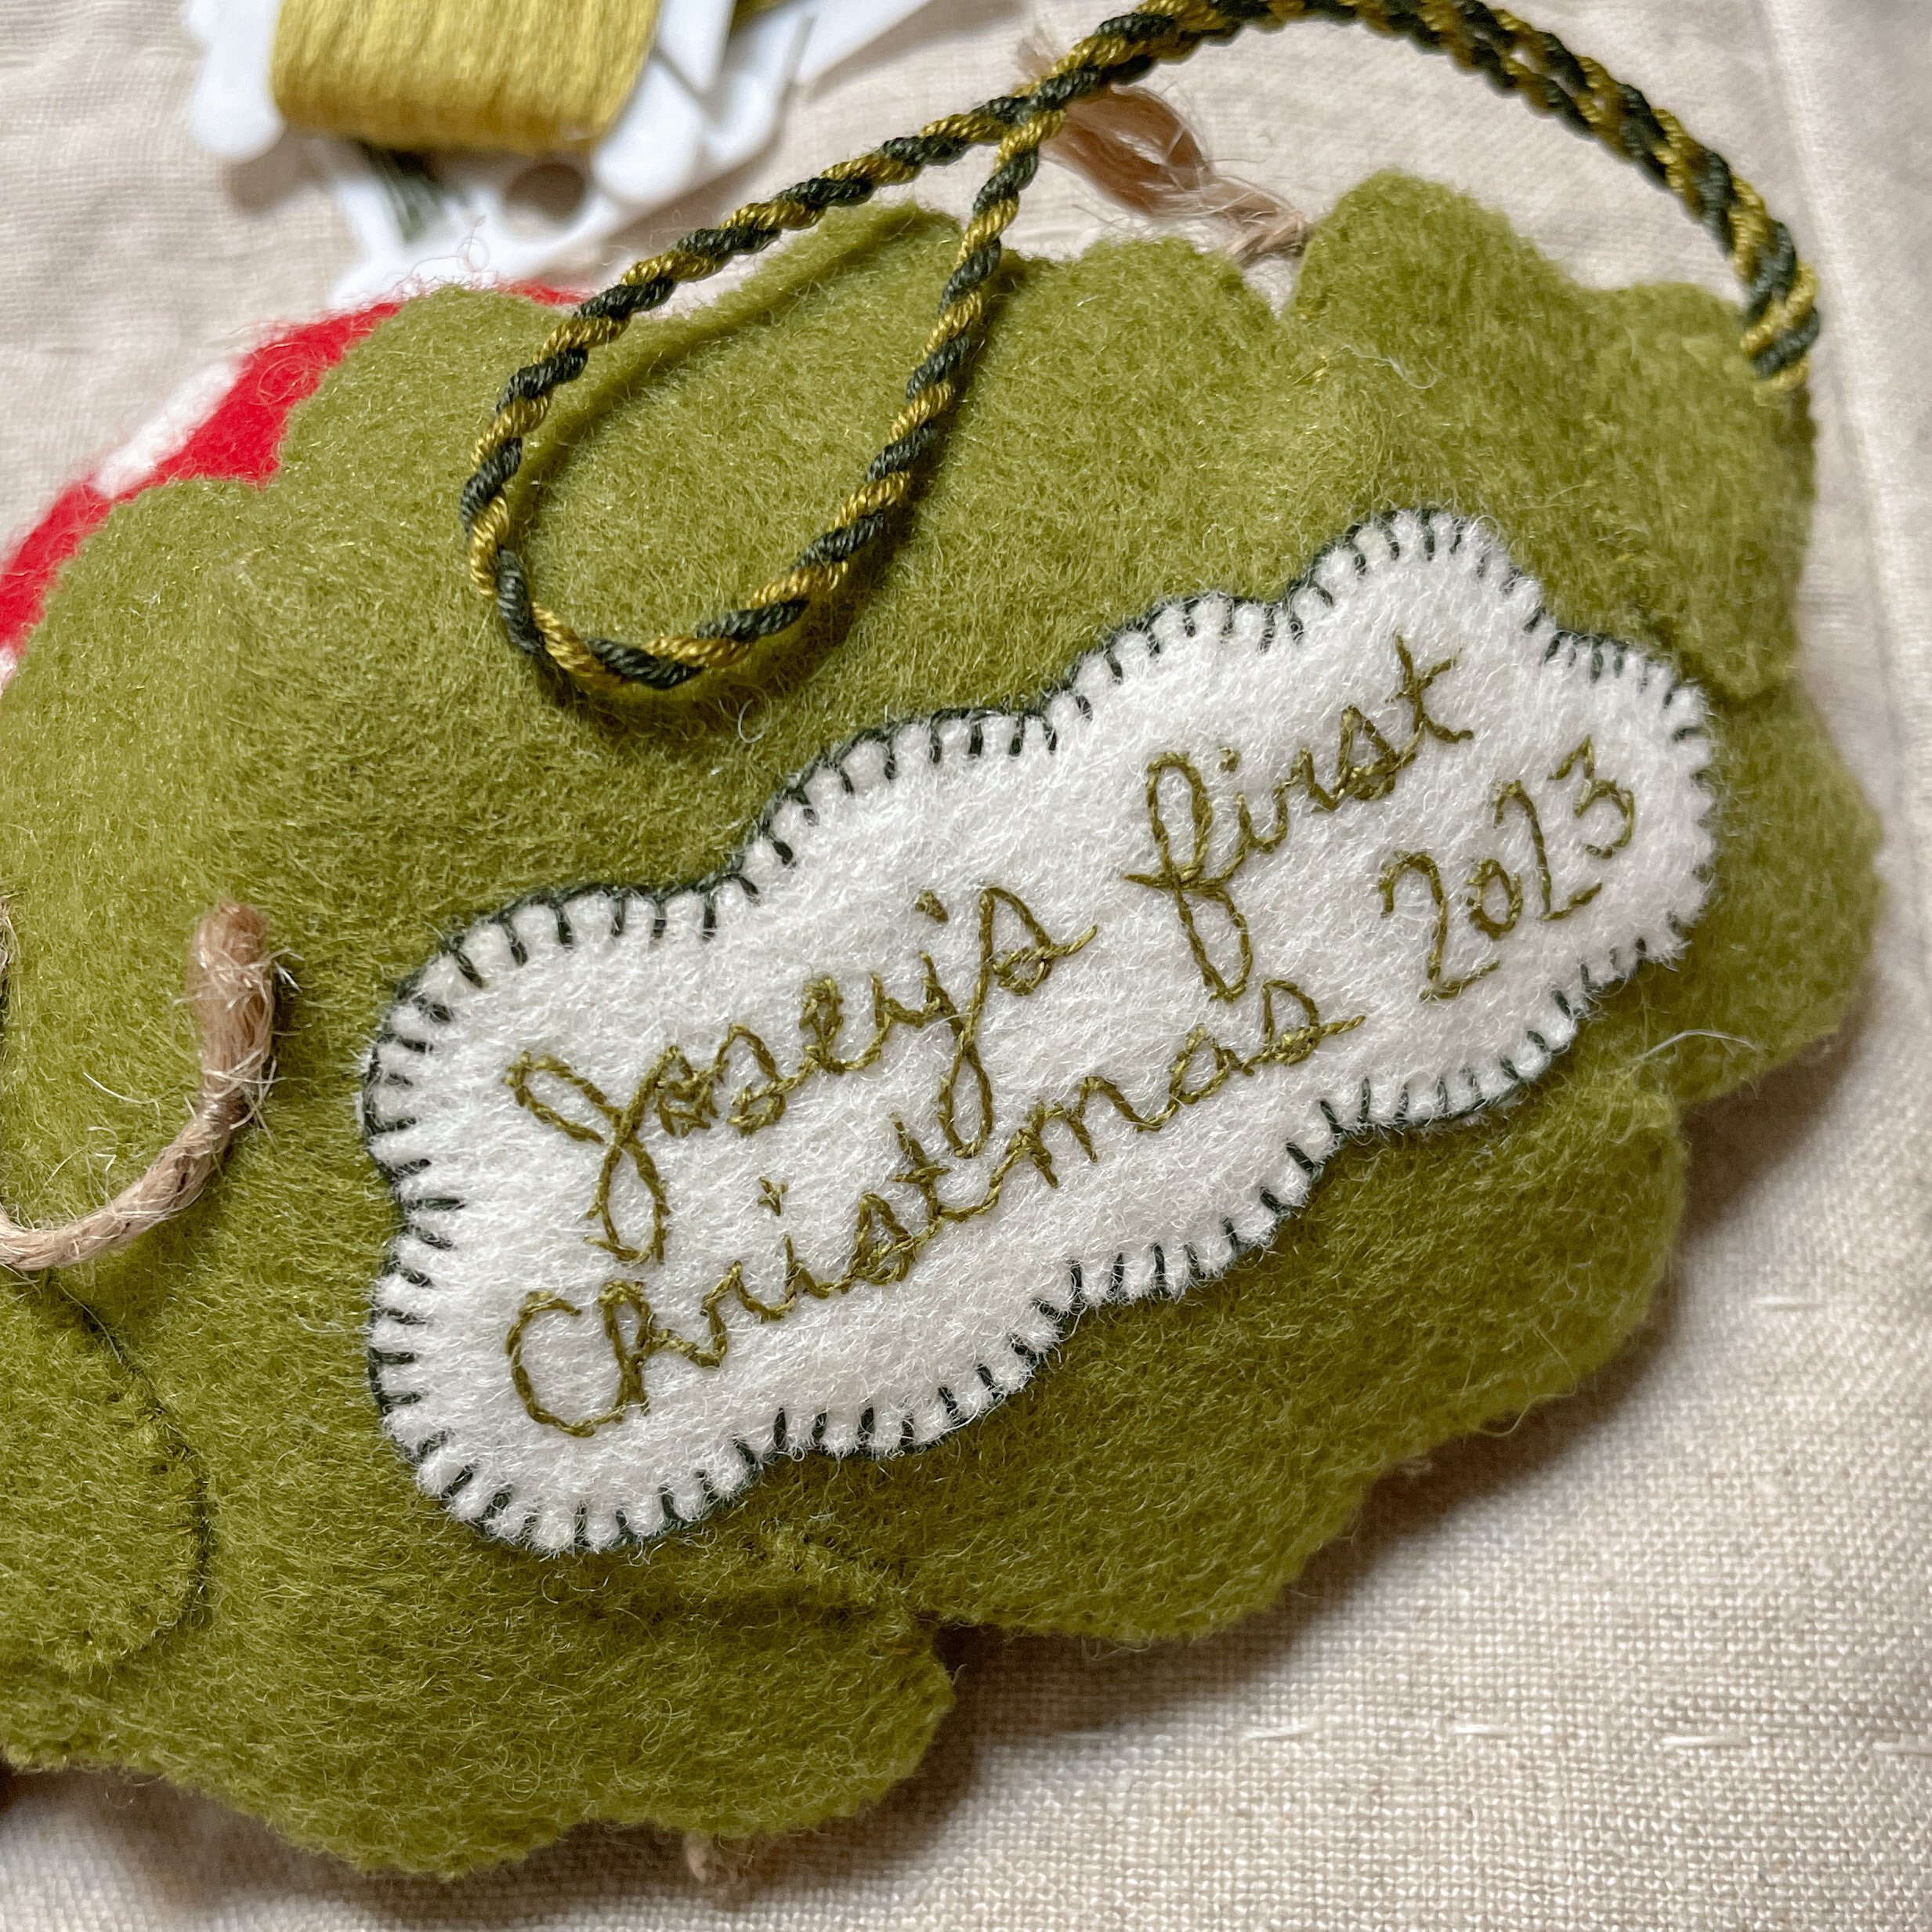
We didn’t decide on a baby name until we met our son at the end of May, so I waited to stitch the tag on the back of the ornament until just now, about three months after his birth. For the embroidered tag I used a washable sewn-on interfacing. So easy to draw my design on with pencil, I stitched it onto the felt with big basting stitches, and then a quick rinse after stitching and it’s gone. Starting this project so early in the year made it easy to get it all done in time for Christmas! Now let’s see if I can get some sort of Halloween costume made in time for his first Halloween. Maybe I should have started with that!

Some Helpful Links:

English language Attelier Pippalotta kits: Bear Dance Crafts

Interfacing: Water Soluble Stabilizer (affiliate link)

How to Cross Stitch on Jersey Knits

Some links in this blog post may be affiliate links. This means if you click through and purchase the product, I earn a small commission at no additional cost to you. Thank-you.

So, I titled this post as if it was more of a tutorial, but really it should read more along the lines of “I did something one time and it worked so well, so I want to share what I did!” I’ve only done cross-stitch a handful of times, and usually on linen fabric, but I really loved the idea of stitching little scenes onto pre-bought baby clothes, which are usually stretchy. I’ve gotten so many simple little onesies as hand-me-downs and gifts, so this is a fun and quick way to add some personality to them.

I used a cross stitch pattern from Fifi Grace Designs on Etsy and the little scenes she comes up with are so sweet and whimsical. As for actually stitching the design on the fabric I used a wash-away 14-count cross-stitch fabric (affiliate link). It’s genius! I use a similar wash-away interfacing for regular embroidery designs, but this one has a little stiffer feel to it and of course tiny holes so you know exactly where to stitch your little x’s.

Using the interfacing is very easy. You first need to figure out how big of a piece you need for your design, and then cut that out giving yourself a little extra space on each side. Baste the interfacing onto the knit fabric around the edges using a long running stitch. If you are sewing a big design you could also add a couple basting stitches in the middle to hold the interfacing to the fabric better, these basting stitches will all get removed later anyways. Then once your interfacing is in place, stitch your design, remove the basting stitches, and wash away the interfacing in water!

If you decide to try this out let me know how it goes! I hope it works as well for you as it did for me!

Links:

Fifi Grace Designs: Duck and Ducklings Cross Stitch Pattern

14-count water soluble canvas (affiliate link)

Thread: DMC 6-strand embroidery floss (affiliate link)

An Up-cycled Dinosaur Embroidered Baby Shirt

Some links in this blog post may be affiliate links. This means if you click through and purchase the product, I earn a small commission at no additional cost to you. Thank-you.

My first make for our coming baby boy! Right away when friends and family started finding out that we were expecting I started getting asked if I I’m planning on making all of my baby’s clothes, and I always have to answer that I’m definitely not! I spend so much time on each piece that I make, so I end up only completing a handful of projects a year, and that just won’t work for a growing baby. But I have been excited to make a couple special things to welcome him into the world. It’s one of the things that has been helping me to relax and prepare mentally.

So my first make has been a little butter yellow henley style t-shirt, embroidered with the sweetest little dinosaurs. The fabric I used is from a shirt I thrifted a few months ago that I didn’t love the fit of. Unfortunately the thrift store near me decided to permanently keep their change rooms closed after they closed them in 2020, and sometimes it’s hard to get the sense of how something will fit by just holding it up. I missed the exchange period and so I wanted to upcycle the shirt into something I would get to use. The fabric is a linen rayon blend, it’s very soft, and it was just enough to cut a baby shirt from.

I used a PDF pattern I found on Etsy: the Miguel Shirt from a shop called costurinha sewing patterns. The pattern includes a long and short sleeve option, and sizes for baby’s and kids. I made this one in the smallest size, the 3 month size, but I’m hoping to get some more use from this pattern in the future. I think a colour-blocked version of it would be really fun as well. The only change I ended up making to the pattern was to add a seam down the back piece. I was using that shirt I thrifted, so I didn’t have enough fabric to cut the entire back piece as one, but I actually love the seam. I don’t think it looks out of place at all and it was what got me thinking about that colour-blocked version.

The dinosaur embroidery pattern is from the Love Embroidery magazine, originally printed in issue 15, but after that issue they added it to their free pattern archive online. I’ll link to the pattern below, which is a design for the magazine by Jessie Newton. It was such a quick and easy one for such a cute touch to this shirt. I used one of my favourite methods for transferring the pattern: I traced it with pencil onto some water soluble sew-on interfacing (affiliate link), and then basted that interfacing onto the shirt before stitching. The interfacing just rinses away when you are done stitching.

I ironed this little shirt before taking these pictures but honestly that will be the last time this ever gets ironed. It was so finicky of course! And really I think with linen wrinkles are just a part of the look. I’ve linked everything relevant below, and I can’t wait to share a photo of my little one wearing this when he arrives!

Links:

Miguel Shirt Pattern: costurinha sewing patterns

Little Dinosaurs Embroidery Pattern by Jessie Newton: Love Embroidery Magazine

Wash-away sew-on interfacing (affiliate link)

My Handmade Wedding Dress: Part 2

Wedding Photos by Isle + Oak Photography

Some links in this blog post may be affiliate links. This means if you click through and purchase the product, I earn a small commission at no additional cost to you. Thank-you.

So nearing a year after my wedding I should probably wrap up recording all the details of this project! I posted a Part 1 (which you can click here to read) where I talked about the materials and supplies I was using, the design sketches, embroidery samples and the mock-up of the dress. I’m going to wrap up everything else in this blog post, which mainly includes the embroidery on the silk organza, hand sewing the dress, and then some final photos from the wedding!

The embroidery motifs I came up with were all pretty fast to stitch, and the little beaded starbursts were really fast and satisfying to stitch onto the organza as well. I think what ended up being more time consuming (and maybe it just felt like that because it wasn’t that thrilling to do), was all of the tracing! I had a little sheet of the 9 motifs I was using, and I traced those onto a paper copy of the dress pattern where I wanted the embroidery to be. I tried to place everything randomly and kept flipping and rotating the motif’s so that they would look a little more unplanned. I then traced these arrangements onto a water soluble interfacing (affiliate link) which I then basted onto my organza fabric for stitching. But once I got to this point and had all of my pieces prepared for stitching I felt like I started to breeze through the actual embroidery.

Wedding Photos by Isle + Oak Photography

The silk organza was going to be the top layer of my dress, so I couldn’t start actually putting the dress together until all of that was done. This made me a little nervous because we were getting closer and closer to the wedding and I didn’t actually have anything coming together that looked wearable! This was the point when I basically had to ditch the sleeves. I had everything else embroidered, and I had just started on the organza for the sleeves, and my anxiety started getting the better of me. I needed to start constructing this dress! I decided that I would make the sleeveless version of the Lune Dress and if I had time before the wedding I would make some detachable sleeves for it (spoiler: I didn’t have time for them!).

Sewing the dress itself took many, many hours. I talked in Part 1 about how I would be entirely hand-sewing this dress. The fabric was just too delicate to risk running through my machine, especially with all the time-consuming embroidery already done. Also, because the organza is sheer, you can also see the seam finishings from the outside, so I wanted them to be very neatly whip-stitched. The dress was three layers overall: the organza over layer, the silk charmeuse main layer, and a silk habotai lining layer. Looking back I wish I would have machine sewn the lining layer to knock a couple days off the construction of the dress, but I think I just got into a mindset that the entire thing had to be hand sewn. By that point for the lining I was just hand sewing to say I did it.

Anyways it all came together and I am really happy with the overall look of it and with the details of the dress. The hem ended up surprising me a little bit in the best way. It almost flares out a little bit where I sewed it, reminding me of a flower shape, which makes this wedding dress feel straight out of a fairy garden scene.

This definitely tops my list of projects I am most proud of in my life. From how much time went into it, to everything new I tried and learned, to the way I felt when wearing it, I just couln’t have imagined a better outcome! I hope you enjoy the photos and I hope this post inspires you to try something just a little bit bigger than you think you can handle, you might surprise yourself!

I also ended up using the piece of embroidery that I had started for the sleeves before I decided to scrap the sleeve idea. We framed a couple of our wedding photos for a photo wall in our apartment, and so to complement the arrangement I framed the embroidery piece in a vintage frame I ordered from Etsy. It looks like I cut a piece of the dress for framing but really the dress is still completely intact and stored away!

This dress, along with a couple of my other projects were featured in Issue 36 of Love Embroidery Magazine. You can order the magazine here.

Some other related links:

Wedding Dress Part 1: Planning, Mock-up, and Embroidery Samples

Our Wedding Photographers: Isle + Oak Photography

Silk Organza Fabric: Maiwa

Silk Charmeuse Fabric: Rokko Fabrics

Silk Habotai Lining Fabric: Maiwa

Beads: Beadworks on Granville Island

Embroidery Thread: DMC Six-Strand Embroidery Floss (affiliate link)

Interfacing: Wash-away water-soluble interfacing (affiliate link)

Dress Sewing Pattern: Lune Dress by French Poetry

Vintage Oval Frame: Carter & Wainwright on Etsy

Wedding Dress Part 1: Planning, Mock-up, and Embroidery Samples

Sewing a wedding dress seems like it ought to be the culmination of my sewing career, although I do hope that’s not the case, I hope there’s some more fantastic projects in my future. The wedding dress just feels different because, when will I have a chance to wear something like this again? This is a big one, and it might be my most exciting make for the next little while.

There are a lot of reasons why I’m approaching this in a very thought-out and well-planned way. Mainly because that’s just me, I don’t tend to ‘wing it’. But also: because I don’t really feel confident sewing with such delicate (and expensive!) fabric, I’ve never actually made a full-length dress, and I really want this one to fit me well. For everyday wear I think a more casual fit is nice, but for my wedding dress? I want this one to fit me like a glove, perfectly tailored. So I’ve actually spent about a month now doing the set-up for this dress. I found a sewing pattern that I fell in love with, the Lune Dress from French Poetry. And you can probably tell from all my recent makes that I need to incorporate embroidery into this, so I decided to do a sheer embroidered overlay or overdress. A vision of this was starting to form in my head.

So a couple things to work out. Will this pattern sew up like I’m imagining? What fabrics am I going to use for the dress, and for the sheer overlay? And lastly, what am I going to embroider on it?

I started with a mock-up or a test run of the Lune Dress pattern. I sewed the mock-up in a lightweight cotton with a tulle overlay, because I already had the cotton in my stash and the tulle cost only a couple dollars a meter. The tulle actually was in the running for the final fabric, but more on that later. The pattern is just incredible, it was so easy to sew up, and not only are the instructions great but there is also a ‘sew-along’ video for it on the French Poetry website. I did have to make a couple changes to make the overlay work, and it was really helpful just to practice all the steps and make my own notes on what helped me. I feel really confident sewing the final dress now that I’ve already gone through the steps once. The fit was pretty good too. I forgot  to take a picture of the ‘before’ fit but basically I just had to take out the waist a little at the side seams, shorten the shoulders, make the dress longer, and then tweak a small fit issue at the centre front.  

As for my fabric choices, I chose an off-white silk charmeuse as the underdress. A silk habotai light weight (8mm) silk for the dress lining. And for the overdress I was torn between the tulle I used on the mock-up and a silk organza. I love how sheer the tulle is, but I honestly struggled a bit working with it on the mock-up. It was so slippery and so hard to see what I was cutting, and the one I was using was very weak! It even ripped a little when I was trying on the mock-up, which really wouldn’t work for hugging and dancing and just the general merriment one does on their wedding day. So I started considering a silk organza I had in my stash. It seemed like it might be too stiff, it just didn’t have the same drape as the tulle, but it is such a beautiful fabric, and it is very strong too. So I decided to do an embroidery swatch on both fabrics. 

These swatches gave me the chance to practice the type of embroidery I want to do on the dress, and I got to see how each embroidered sheer fabric would look overtop the silk charmeuse. This process sold me on the silk organza, it was just so much more enjoyable to work with, and I was more excited when I held it in my hands. As for the drape, I spent some time googling silk organza dresses and wedding dresses, and I found lots of beautiful examples. I think as long as the fabric is cut the right way then it will drape in a nice feminine way. There are of course a lot of seamstresses who make very boxy garments with organza, but I don’t think with the pattern I’m using it will be boxy at all.

And my embroidery turned out exactly as I hoped. Lots of floral and botanical elements and then the beaded starbursts just make me so happy. It’s all enjoyable to stitch and not too time consuming (which is very important, considering this dress has a deadline!).

So that’s pretty much where I am now. I feel really confident to power ahead on the final dress. I am going to be hand stitching the entire thing because the thought of putting these fabrics anywhere near my machine just stresses me out. I’ve never had luck sewing fabrics like this and I would just much rather turn on some music and stitch away by hand. In fact I’ve been following a couple hand sewing teachers lately and have really been preferring that process. I bought myself an instructional book called Hand Sewing Clothing: A Guide by Louisa Owen Sonstroem so that I would have as many tips and tricks before I really got started on this dress. So this week I will be working on thread tracing all my pattern pieces. This is essentially drawing the pattern pieces onto your fabric using basting stitches. I always do this anyways for embroidered panels but for this project I’m going to try it for all the pattern pieces. It will make for some very precise sewing. Then I need to plan all my embroidery pattern arrangements for each pattern piece, and then it’ll be onto the mammoth portion of this project: the embroidery! 

Supplies and resources I’m using so far: